Monday, October 14, 2013

Microsoft Office Word Draw - changing the connector start and end points - change the connection points

Drawing Tools from Microsoft Office is a very handy and user friendly tool, but some of the drawing features are very limited even for general use. One of these features is the connector. A connector is a line that connects two shapes and stays connected to the shapes that you attach it to. Connection points appear at the ends of a connector, and additional connection points are indicated by circular dots when you move your mouse pointer over a shape. The main advantage of using connectors is that connectors remain attached to and move with shapes.

Although the concept of connectors is very good in Microsoft Word - Drawing Tools, the handling of the connectors is poor. And it seems that from Word 2003 version to present, the Microsoft engineers does't made any improvements to the connectors.

In this article I will present an workaround that will enhance the present connectors features.

Let's presume that we have a presentation to make about an applications that uses two databases and we want to graphically represent this. We will probably need to draw one rectangle which represents the application and two cans for databases.

How can we do this into a Word document?

1. Go to Insert -> Shapes and click New Drawing Canvas
2. Then from Shapes menu first we select a rectangle and then two cans.
At the end we will need to connect the cans to the rectangle with a connector.
Connectors can also be found in the Shapes menu (see image below).

Now here is the funny part: if you have the default settings in Word, when you will try to connect a connector from one shape to another the starting and ending point will snap to the closest connector point of the shapes. It seems that even if you will change the Word settings and uncheck the Align -> Grid Settings -> Snap objects to other objects setting, the behavior will remain the same, which is very frustrating.

Connector starting point (current mouse pointer) and the shape connectors (the blue dots):

The connector snapped to the closest shape connector point:

The connector ending point snapped to the closest rectangle connector point:


One potential solution would be to press ALT when you start / end the drawing of the connector. But in this case the connector will become a simple line not connected with the ending shape. So in this case we cannot take advantage of the connectors features.

When we will want to add a second connector, the ending point will snap to the same ending point of the first connector.

Sometimes this "snap to shape connection point" may be helpful, but we don't want every time to have the same ending point of the connectors connected to the same shape. In our case we want two different ending points to the bottom of rectangle. So if we cannot change the position or the number of the default connection points of shapes what can we do?

Solution:
We "create" another two connection points:
3. Add two more rectangles (or any other proper shape)

4. Select the two new added rectangles and format their Fill and Line to No color (right mouse on selected shapes Format AutoShape... -> Colors and Lines)
5. Select all three rectangles and group them (right mouse on selected shapes Grouping -> Group)

6. Add a new connector from first can to the connection point of the first new created rectangle.
As you can see now we have four more connection points at the rectangle.

7. Add a new connector from second can to the connection point of the second new created rectangle

Here it is: brand new connectors at the bottom of the old rectangle shape.

Saturday, February 2, 2013

Unlock your Samsung Galaxy mini 2 - GT-S6500D

It seems that my last post (one year ago - shame on me for not writing anything meanwhile) helped many people to unlock their phones for free. So I decided to write a new post about unlocking phones for FREE. This time it's about Samsung Galaxy mini 2 or GT-S6500D. As far as I read the next method can be applied also for model GT-6500.

First of all I have to mention that the following unlocking steps are not mine, I just found them on a forum (see resources at the bottom of the post) and I tried to make them simpler and readable. I test the following steps on my phone and it worked.

Note: I am, in anyway, not responsible for whatever may happen to your phone, but I am sure it works to unlock Samsung GT-S6500D because I have tested myself.

So here are the steps:

1. Initial conditions on my personal test (the unlocking is working for many other various conditions):
 - The phone was locked in Vodafone (Romania)
 - The phone was not rooted
 - The phone had installed Android ver 2.3.6 (Gingerbread)
 - The phone had no sim inserted

2. Check if the phone is actually locked:
2.1. Open the Keypad (Dialer) and type the service code number: *#7465625#
2.2. There will be displayed some information about the phone. Look for "Network Lock". If it is set [ON] the phone is locked.

3. Unlock the phone:
3.1. Open the Keypad (Dialer) and type the service code number: *#197328640#
3.2. A menu will appear. Select (touch the screen) option [1] DEBUG SCREEN
3.3. From the submenu select [8] PHONE CONTROL
3.4. Then select [6] NETWORK LOCK
3.5. Finally select [4] NW LOCK NV DATA INITIALIZE
3.6. After the last select you may have to wait 1, 2 minutes to unfreeze the screen
3.7. After 1, 2 min you can exit the menu and restart the phone

4. Enjoy the unlocked phone
4.1. After restart you may check if the phone is now unlocked by opening the Keypad and typing the first code again: *#7465625#
4.2. Now you should see that the Network Lock is set on [OFF]
4.3. You can now turn the phone off, enter a sim from another network, start the phone and see if it's working.

If you have a different Samsung phone model you may take a look at the following link:
http://www.droidforums.net/forum/hacking-help/167546-tutorial-unlock-sim-network-samsung-galaxy-mini-gt-s5570.html
They claim that they successfully unlock for free models as Samsung Galaxy Mini S5570, Ace S5830, Gio S5660, Pop i559, 5 i5500, Fit S5670

Resources:
http://forum.xda-developers.com/showthread.php?t=1958859

Friday, January 6, 2012

Unlock your Samsung Phone GT-I5500

For almost a year I have searched a way to unlock my Samsung smartphone. I bought this phone locked in Vodafone network and the costs requested by the vendor to unlocked the phone were too prohibitive (50 eur ???). Now I finally manage to unlock it. Below I will try to synthesize the steps followed by me in order to unlock my phone. The model used was Samsung GT-I5500 but the smart guys that discover the way to unlock the phones say that this method can be applied to many other Samsung smartphones.

How to unlock Samsung GT-I5500:
1. first root the phone (this can be undone after you unlock the phone)
2. extract an image file from phone to pc
3. search the unlock code in the extracted file
4. optional: unroot the phone
5. turn off the phone, change the SIM card with the SIM belonging to another network, turn the phone on, enter the unlocked code searched and you are set.

Now the above steps developed:

1. Root the phone:
In order to root the phone I used the recomanded tool SuperOneClick
http://forum.xda-developers.com/showthread.php?t=803682
1.1. Download the app
1.2. Unzip donloaded file
1.3. Connect phone with PC by USB (default kies mode)
1.4. Put your phone on USB Debugging mode (Settings -> Applications -> Development -> USB debugging [X])
1.5. DO NOT mount your SD card
1.6. Run the SuperOneClick app
1.7. Click on Root button

2. Extract a specific file from the phone
There are 2 methods available. I used the first.
http://forum.xda-developers.com/showthread.php?t=1335548
2.1. First you should install Android SDK Tools: http://developer.android.com/sdk/index.html
2.1.1. Download and isntall the Android SDK.
2.1.2. Run SKD Manager and install all necessary packages.
2.1.3. You will only need ADB Shell from the Android SDK Tools
2.2. Open one instance of "Command Prompt" and go to folder containing ADB tool (adb.exe). (e.g C:\Program Files (x86)\Android\android-sdk\platform-tools>)
2.3. Make sure your phone is connected to PC and "USB Debugging" it's enabled. Make sure that you enabled the SD card
2.4. The following commands will be executed in "Command Prompt" that we opened earlier:
2.4.1. adb shell
wait the # prompter to appear after each command
2.4.2. su
2.4.3. cat /dev/block/bml5>/sdcard/bml5.img
2.4.4. exit (2x)
2.4.5. adb pull /sdcard/bml5.img
2.5. The file that we copied to PC should be in C:\Users\~username~\AppData\Local\VirtualStore but you can do a quick search to find it.

3. Search the unlock code into the extracted file
Use any editor that supports HEX View. I have used the Notpad++ with HEX Editod plugin.
3.1. search for
FF FF FF FF FF FF FF FF FF FF FF FF FF FF FF FF FF FF FF FF FF FF FF FF 30 30 30 30 30 30 30 30
3.2. Above this string you should see the unlock code which will be 8 digits plain text surrounded by unknown symbols.
3.3. If the code is not found from the first search, search again.

4. Unroot the phone (Optional)
You may want to unroot your phone back tho the initial unrooted state.
4.1. Run the steps from 1.3 to 1.6
4.2. Press Unroot button.

5. Unlock the phone
The last step from this tutorial is to actually unlock the phone.
5.1. Turn off the phone
5.2. Change current SIM with a SIM belonging to another network
5.3. Turn the phone on
5.4. Enter the unlocked code searched

Now you should have an unlocked smartphone and you can use any SIM card from different networks.

Resources:
http://forum.xda-developers.com/showthread.php?t=1335548

Friday, August 5, 2011

Excel String Functions and Other Tips

Here are a couple of functions that you can use to manipulate strings in excel. Note that there are many other string functions available in Excel, but the next presented are most common.

1. PROPER(text) - capitalize first letter of each words from a text
For example:
cell A1: "test text"
cell A2: =PROPER(A1) would return "Test Text"

2. UPPER(text) - upper each char from each word from a text
For example:
cell A1: "test text"
cell A2: =UPPER(A1) would return "TEST TEXT"

3. LOWER(text) - lower each char from each word from a text
For example:
cell A1: "test TEXT"
cell A2: =LOWER(A1) would return "test text"

4. LEFT(text, number_of_characters) - return the first number_of_characters characters from text text
For example:
cell A1: "test TEXT"
cell A2: =LEFT(A1, 3) would return "tes"

5. RIGHT(text, number_of_characters) - extracts a substring from a string starting from the right-most character
For example:
cell A1: "test TEXT"
cell A2: =LEFT(A1, 3) would return "EXT"

6. LEN(text) - returns the length of the specified string
For example:
cell A1: "test TEXT"
cell A2: =LEN(A1) would return "9"

________________________________________________

Now here are a couple of special combinations of the above functions to achieve different results:

1. Upper first character from a text and let the rest of them unchanged
=UPPER(LEFT(A1;1))&RIGHT(A1;LEN(A1)-1)
For example:
cell A1: "test text"
cell A2: =UPPER(LEFT(A1;1))&RIGHT(A1;LEN(A1)-1) would return "Test text"

2. Split a string into multiple columns using a token (string tokenizer)
2.1. Select the column or cell that you want to split
2.2. Make sure that you have enough blank columns in the right
2.3. Go to Excel menu -> Data -> Data Tools -> Text to Column
2.4. From the Wizard that appears select Delimited option and click Next button
2.5. In the next Wizard window select Delimiter -> Other: -> enter your own delimiter
2.6. Click Next to preview the data resulted and then Finish
For example:
cell A1: "test - text"
Follow the above steps and select the "-" delimiter
Would result:
cell A2: "test "
cell A3: " text"

Thursday, June 16, 2011

Setting Up A Virtual Host in Apache

Yesturday I installed an web application that required a valid domain name, something like http://domain_name.com (http://localhost/my_site was not allowed).
The question was how can we provide a valid domain name to this application, which is installed on the local machine, assuming that we don't have bought an domain name?
The answer for this question is that we set up a virtual host which points to 127.0.0.1 which is the localhost.
If we presume that we run Apache server on Windows machine, here are the short steps of how to do this virtual host:

1. Configuring Apache
Locate and edit Apache httpd.conf file by adding the next lines at the end of the file (e.g. apache_home_folder/conf/httpd.conf):

NameVirtualHost 127.0.0.1
<virtualhost 1="">
  DocumentRoot "C:\My Sites\Site1"
  ServerName domain_name.com
</virtualhost>

Note 1: If the above path for DocumentRoot does not have any spaces in it, do not quote the path.

Note 2: Starting with Apache 2.2, the above modifications should be made in httpd-vhosts.conf file, which will be located in the extra folder (e.g. apache_home_folder/conf/extra/httpd-vhosts.conf). Also make sure that the line:

Include conf/extra/httpd-vhosts.conf

is uncommented in httpd.conf file.

It is also needed to add the next lines to httpd-vhosts.conf file:

<directory my="">
  Order Deny,Allow
  Allow from all
</directory>

then add the NameVirtualHost 127.0.0.1 ... lines.

2. Resolving the DNS issue
Locate the file

C:\WINNT\system32\drivers\etc\hosts

or

C:\Windows\system32\drivers\etc\hosts

At the end of this file add the following line:

127.0.0.1 domain_nalme.com

and save the file.

If you cannot save the file, run the editor with administrator permissions (right click on the editor and select Run as Administrator option) and then open the file in the editor.

3. Restart Apache server
All you have to do now is to restart the Apache server and test the virtual host in your browser: http://domain_name.com

Resoueces:
http://apptools.com/phptools/virtualhost.php

Saturday, May 21, 2011

How to replace a key on Acer Notebook Keyboard

No meter how careful you are with your laptop, sooner or later you will find your keyboard filled with dust, lint or even small pieces of food. Sometimes, all you have to do to clean your keyboard is to turn your laptop on one side and blow. But sometimes, dirt is sticking beneath a key and no meter how hard you will blow, the dirt will not easily go away. The annoying part is that the key with dirt will not work properly anymore until is cleaned.
In this post I will show you step by step how to remove, clean and put back a key from an Acer Notebook keyboard (Aspire 7736Z).

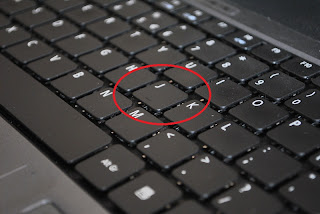
1. First, search for a small screwdriver. A tweezers is optional but can help.
I will exemplify on "J" key.


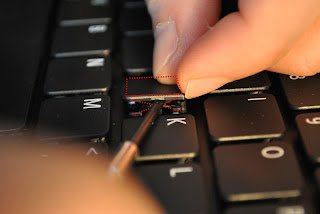
2. This step is the most important one and it will require you to handle the screwdriver very carefully.
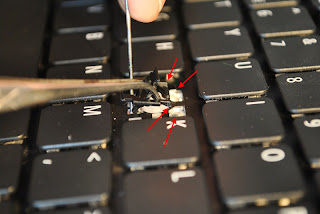
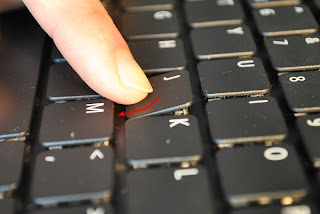
The key have tow main pieces: the plastic part with letter on it (the part that you can see) and beneath an "X" mechanism. Gently insert the screwdriver beneath the hey, between the part with letter on it and "X" mechanism.


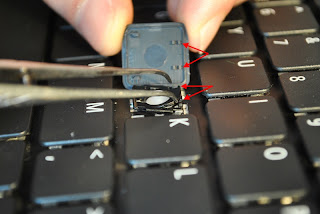
3. Now gently rotate the screwdriver until the part with letter on it detach from "X" mechanism. The part with letter on it have to detach from tow points.


Here are those tow connection points between part with letter on it and "X" mechanism.


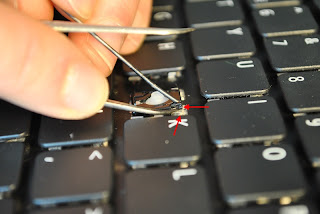
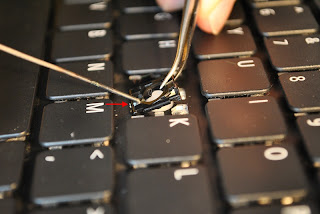
4. The hardest step was to remove the part with letter on it. After that, you may also need to remove the "X" mechanism. The "X" mechanism is attached to the keyboard in three contact points. With the same small screwdriver detach the "X" mechanism from tow of the three contact points.


5. Now you can start the cleaning.


6. After you finished the cleaning, follow the steps back to the begining.
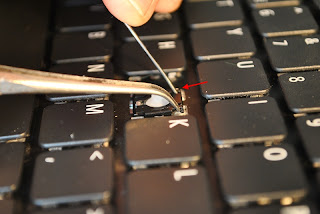
First connect the "X" mechanism to the lower connection point from the keyboard.


Then connect the "X" mechanism to the other tow connection points from the keyboard.


Now you are done with the "X" mechanism.


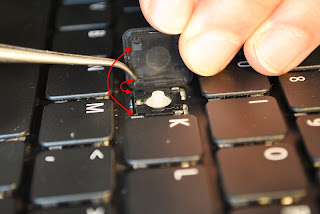
7. And the last part: attach the part with letter on it. First put the part with letter on it over the "X" mechanism and slided into the lower tow connection points of the keyboard.


When the part with letter on it is in the right place, press on the upper left side, then the upper right side until it clicks into the initial position.


This is it. Now you have a clean keyboard.

Friday, May 20, 2011

Opera - Remember choice and do not show dialog again - problem

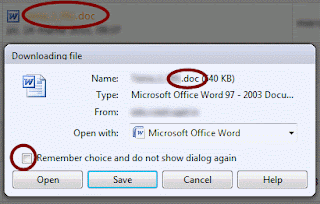
I usually use Opera to surf on Internet. Opera is the fastest browser I've ever try, and it have a unique set of features that cannot be found on the other browsers. A couple days ago I was surfing some documents in Moodle. The documents type ware .doc, .docx, .zip, .txt... you get the picture. First, all those documents should be downloaded in order to be viewed. So when I press on a document, the "Downloas file" dialog appears. From this dialog you can select either Save or Open button. I usually use Open to directly open the document with the appropriate application. If the type of the document is .doc it will be opened by MS Word, if the type is .txt it will be opened by Notepad.
In addition, this dialog have an interesting option, "Remember choice and do not show dialog again", which I ignored for a very long time, until tow days ago, when by mistake I select the option's checkbox.


From that moment the Opera changes his opening behavior: all files are now opened with MS Word, even .pdfs or .txts. So the question is how can we undo the checkbox selection?


1. What happened when I selected the checkbox?
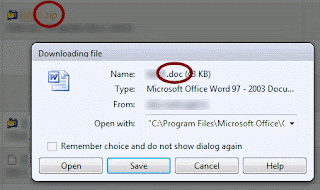
When I selected the chekbox from "Downloas file" dialog, in Opera was added a new MIME type called "application/x-forcedownload". And because I selected the chekbox when I was opened a .doc file, by default the "application/x-forcedownload" type is opened by MS Word. This was happened because in Moodle all download-able documents have the type "application/x-forcedownload". So when I try to open a .zip file in Moodle, the web server says to Opera "this file have the type application/x-forcedownload" and try to open the file with default application, MS Word.

However, when you will try download / open a zip file from other website, most probably that you will not have any problems, because the website tells to Opera "this file that you want to download have the type application/zip", so Opera will open the .zip file with the correct application.

2. How can you undo this behavior?
To undo the changes made when you click by mistake the checkbox in "Downloas file" dialog, all you have to do is to remove the MIME type called "application/x-forcedownload".
To do this follow the steps below:
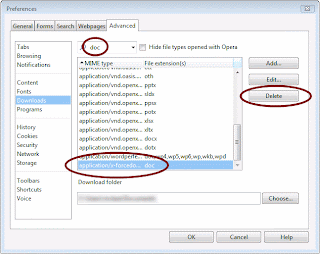
- Open Menu Settings > Preferences > Advanced > Downloads
- Uncheck "Hide file types opened by Opera"
- Enter "doc" in Quick Find
- Select "application/x-forcedownload"
- Click "Delete" button


This is it. Now is back to normal.

Resources:
http://my.opera.com/community/forums/topic.dml?id=181696